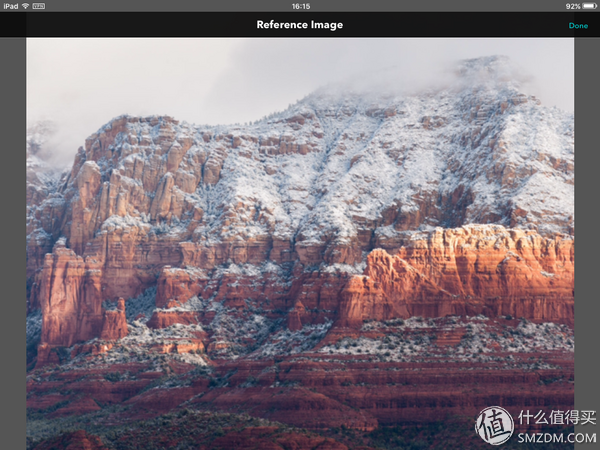
The Mid-Autumn Festival is coming, and the annual filming competition is about to begin. The fight for the new Master and the old Master is gearing up. Saying that the cauldron bought a big telephoto last year is to try to shoot the moon.

Then I took such a big photo, I thought it was interesting at first. Later I found it really boring. I shot it and it was the same.
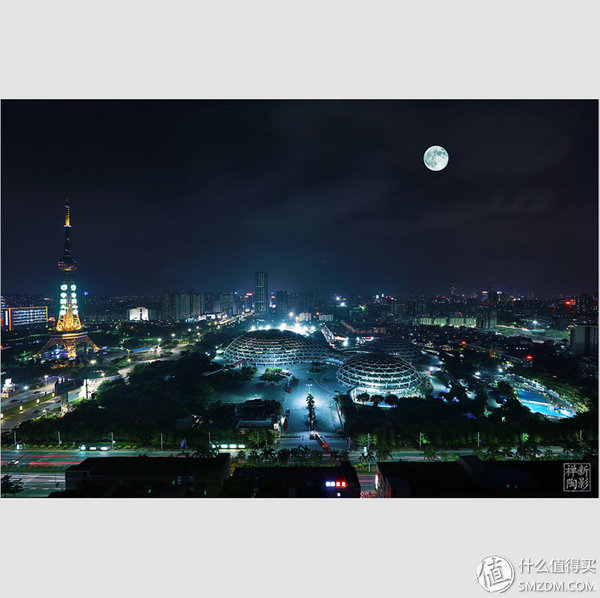
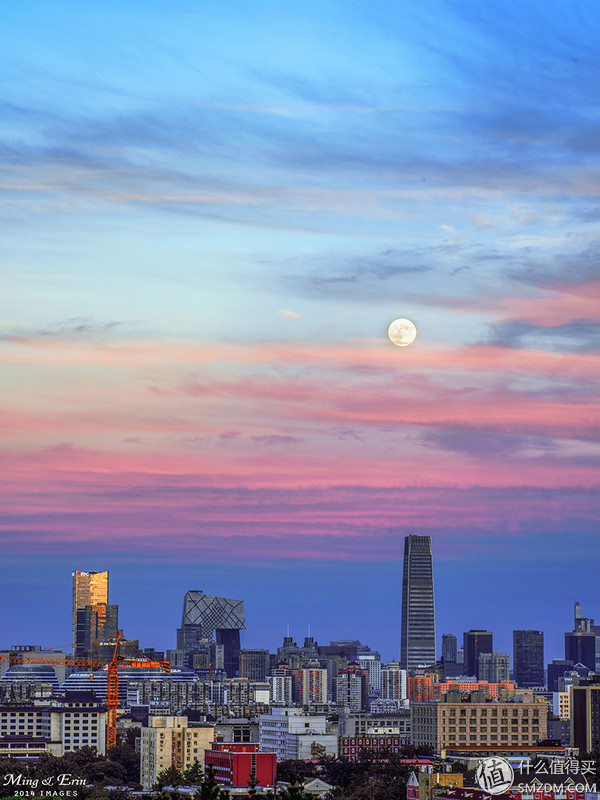
Later found such photos, the moon and the urban landscape together, but many are late synthesis, but some are still taken in real life. Therefore, the cauldron was thinking about how to take the perspective of the scene and the moon, and began various searches, and finally found two powerful apps. TPE and PhotoTransit. This article will not talk about the problem of equipment. The cauldron has not used any advanced equipment. Anyway, the most used moons are telephoto, long and long, and yes, they are thick, dark and long. The kind of. The following is the App mentioned in this article.
Full name of TPE, The Photofrapher's, Ephemeris
Photo Transit and TPE purchased separately are 8.99 US dollars
If you only need $12.99 to buy a suit, it's a good deal. There is, this software is not in China, we can go to the United States to buy.
The following points are related to the theme. To photograph the moon, we must first know about the moon. Now that the network is so developed, you can find a lot of information about the moon. You can find the moon periodic table, There are latitude and longitude, so, but if you want to better photograph the moon, you need more information, because if you simply shoot the moon, do not have to wait until the Mid-Autumn Festival, any day can be, but the Moon will look at the Moon will be relatively large If you can match the local scenery, or some buildings will be better, so you need to know more information, such as the monthly rise, the moon landing time, running track, and the angle at that time. To shoot with a building, you need to know the orbit of the moon's moon, as well as the angle. Knowing the running trajectory is equivalent to knowing where the moon is located. You can estimate the visual height by knowing the angle. Can estimate whether some buildings can be in the same picture frame. But how do these data be known, then it needs a slightly more professional tool. First of all, let me introduce the TPE app. Before the cauldron collected information on how to take pictures of the moon, it was unintentionally discovered that someone had said it. This, a very comprehensive web page, there is also a web version of the function, but it looks like science to go online, ios end of the app all in English, and there is a certain professional English vocabulary, so the cauldron is just a little knowledge, it focuses on giving you a Ideas.
First of all, let me explain the train of thought. First of all, we must open the pattern of the soul painter. Hey ~~~~
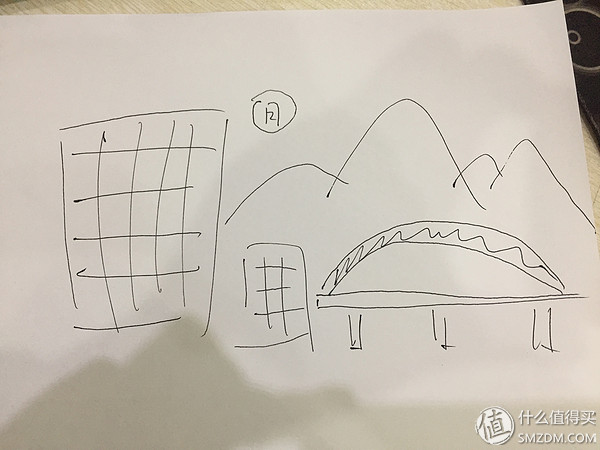
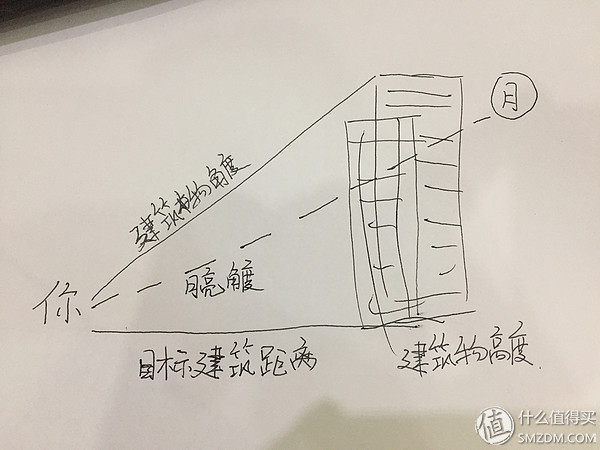
This is the basic idea, as shown in the above figures, some of the data, your distance and angle from the target building, the height of the target building, and your angle to the moon, and then you can estimate whether the moon can be with the building. This basic idea is still quite simple. If you are shooting officially, you should also pay attention to the exposure problem. After a long exposure time, the moon has become a big light bulb, which is very unattractive. We can find a black transparent glass, or a gradient mirror, blocking the moon.
Well, the idea is over, let me talk about the App to introduce below, really introduce the App, if it is an old mage, the following software can not read. One is a variety of information apps such as the sun and moon tracks, and the other is an app that simulates your equipment and maps and simulates points.
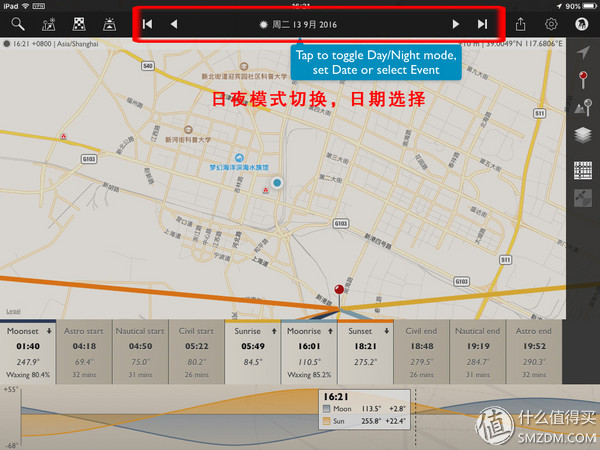
Open TPE will see a simple tip, the first is to tell you, click on the date can change the day and night mode, and date.
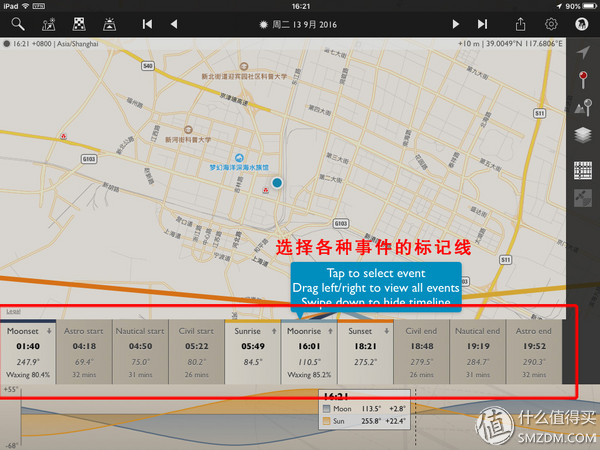
The second is the event area below, which can be hidden or displayed
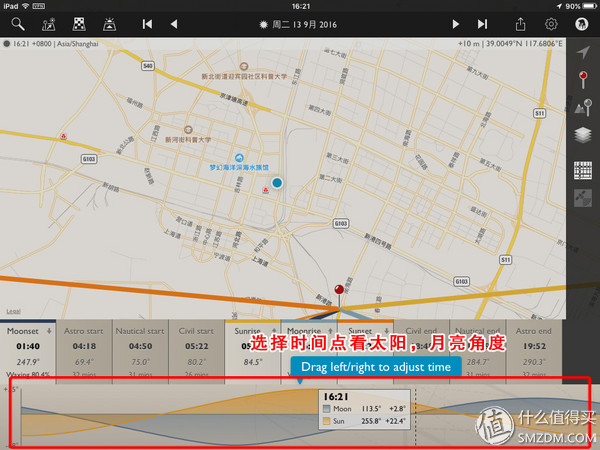
The third is to move the timeline left and right. You can see the angle of the sun and the moon. This angle is also more important.
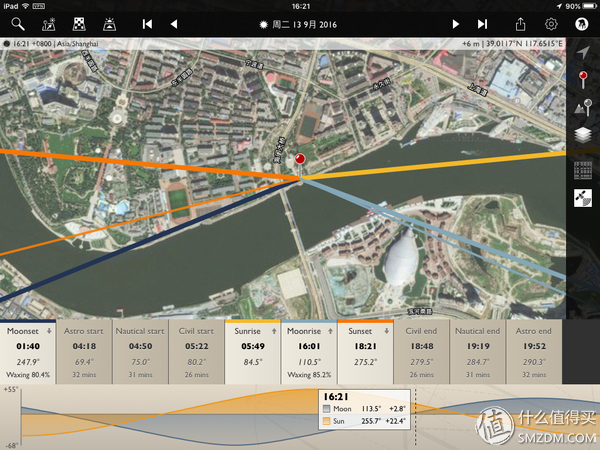
Then switch the map to satellite mode, use satellite maps to see more clearly, various underground sun rising and sunset time, and various angles and time spans. Moonset, Sunrise, Moonrise, Sunset These events, marked with different colored lines, four thick lines, you can see the angular position of this time, and the thin line is the current state of the sun and moon.
Drag the timeline below to see the thin lines of the sun. The trajectory of the moon follows. The angle below changes as well. The middle point is the angle and distance from your point to your target building. value.
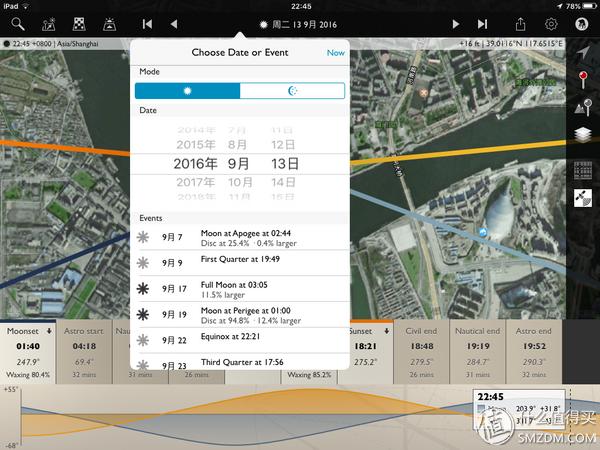
Click on the date will appear an option, the sun and the moon mode, the default is the sun mode, the following can choose the date, also behind the sun, the moon's various events information marked on the very convenient view.
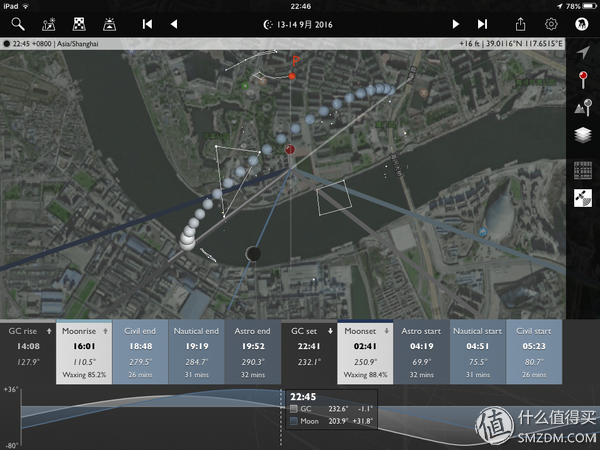
If you choose the moon mode, it becomes this kind of, is not very high-tech, the moon track, and some signs of the constellation, astronomers will love to have wood!

The same below is the timeline can be dragged, does not feel very cool, is not remembered a song, the moon goes, you walk, the moon does not go, you still go! It's very intuitive to see when the moon is out of the range you can see. If you just shoot the moon above this information is basically the same.
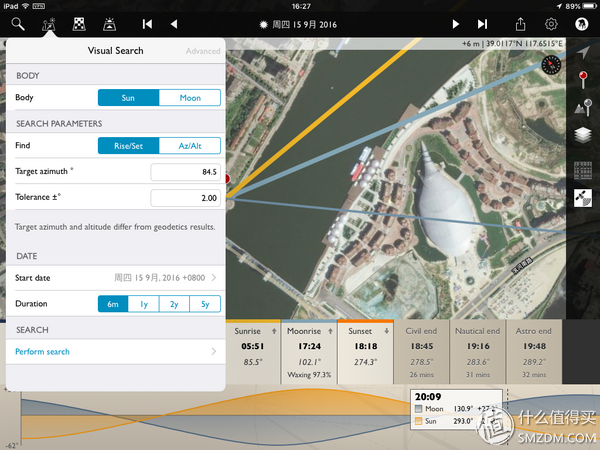 But if you have some other needs, it is set individually. Several function keys from the upper left corner, the first is search, search for cities, can reach the city's location. The second one is that if the English is not graduated from cauldron, it will no longer show off. I do not know what I mean. In any case, I can set various settings.

The second name, shadow, and elevation are also set on demand, but I didn't understand it too much and I didn't want to understand it. . .

The last one is the elevation of the horizon. This is adjusted according to your own needs.
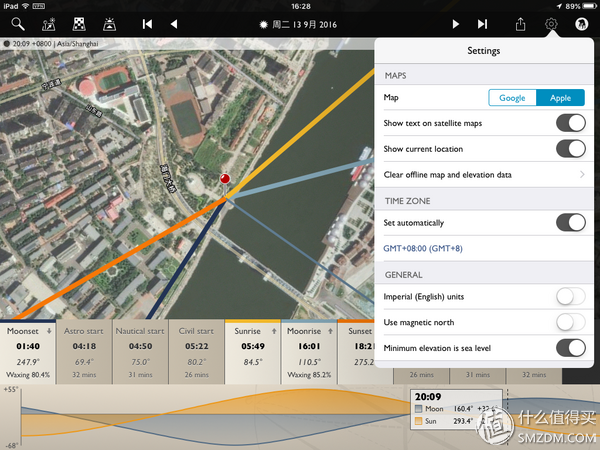
The gear on the right is the setting button. Everyone sees the icon and knows it. Many settings, such as the map using google or using the map of Apple, use google map to be scientific.
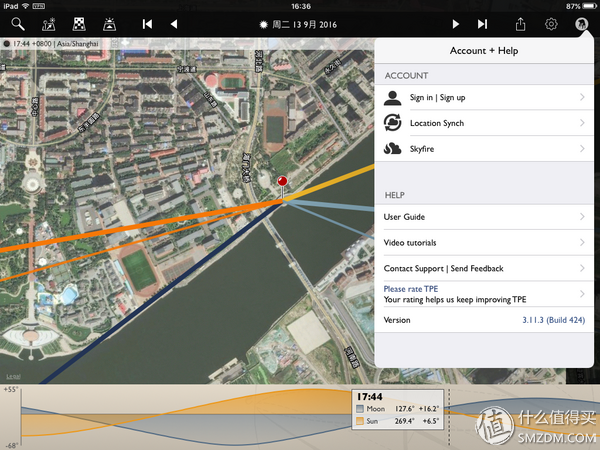
The last icon of a photo shooter is a personal setting. You can register for an account, and then you can use your account. . .
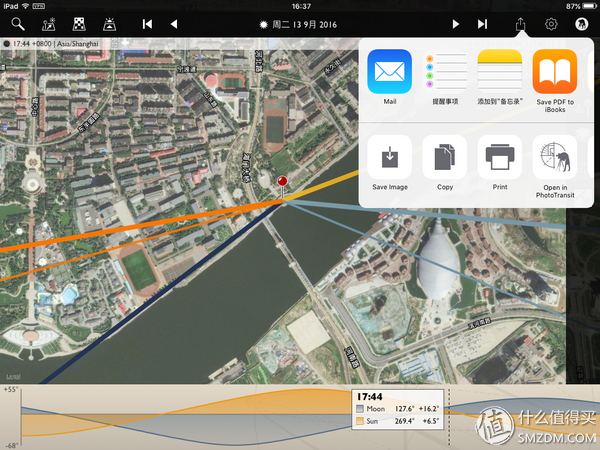
The button on the left is what everyone sees and knows. It is a share button. You can take a screenshot, print it, or open a current setting on the companion software PhotTransit.
Everybody basically understands it. Personally, if it is just to shoot the moon, to understand these basics, it should be almost. If it is an astronomy enthusiast, then you have to study for yourself. If you still do not understand, you can go to the official tutorial bar, in the personal account options, of course, must first scientific Internet access, or else can not see.
I will talk about the PhotoTransit software mentioned earlier.
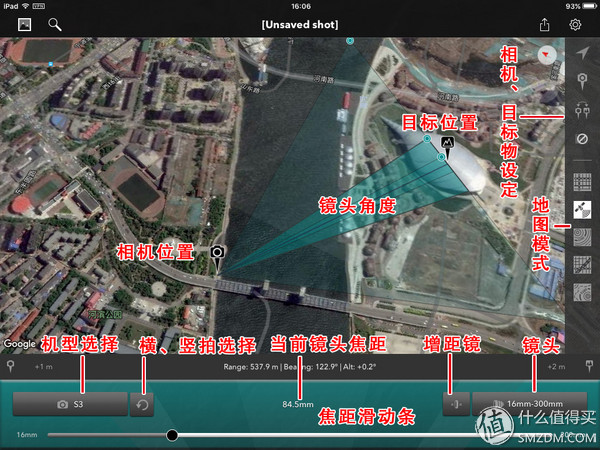
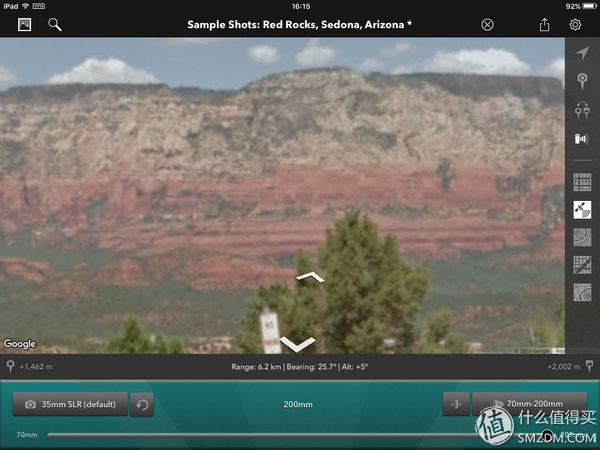
This app must be scientifically accessible because only google maps are available. After opening the app, you can see a variety of information. I have marked it with a red letter.
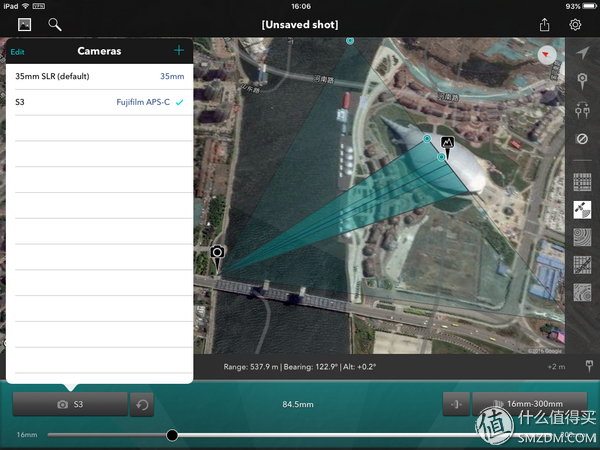

Click on model selection, you can choose according to your model, cauldron use retro Fuji S3 Pro, we can choose according to their own models, if not, directly to find DSLR, SLR or M4/3 what, almost Yes.
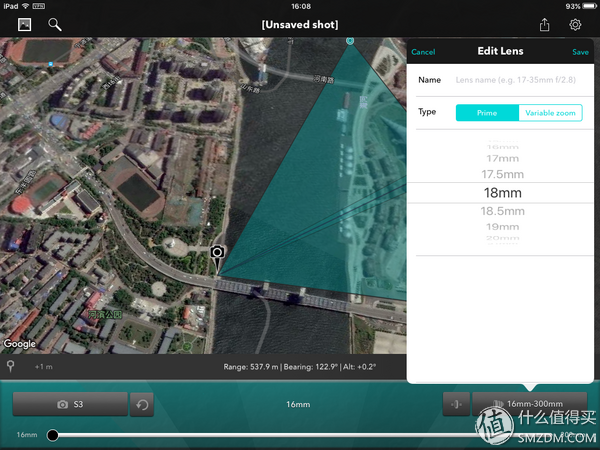

The last side of the lens options, you can choose to use the lens, there are two options fixed focus and corners, according to their own lens to choose just fine, will be saved after the election, do not have to set the time to switch the lens once again.
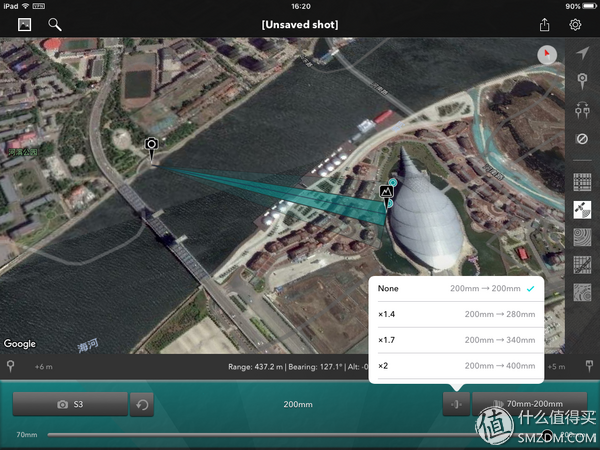
If you have teleconverter, you can choose it, is it not very comprehensive.
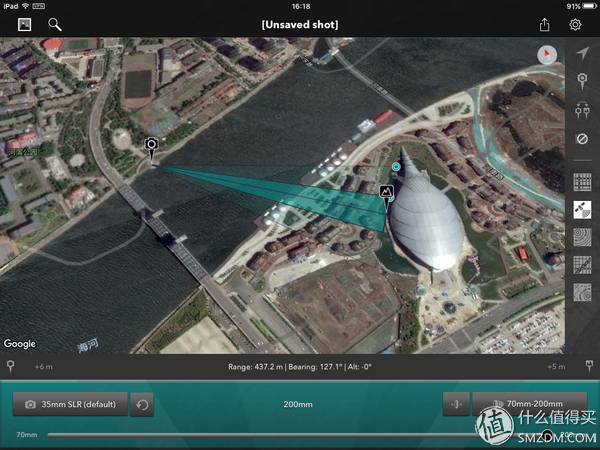
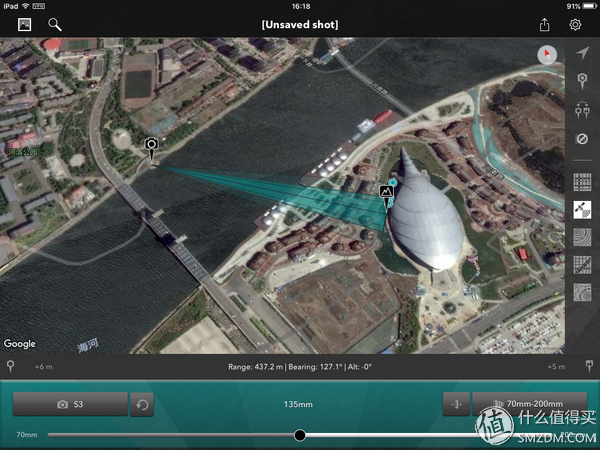
The camera's visibility, do not worry about whether there is fake, the above figure selects the full-width model, the following figure is selected as Fuji S3 residual width model, lens selection 70-200 can, it can be clearly seen that the wide-angle and telephoto end are not The same, so do not doubt the problem of camera visibility.
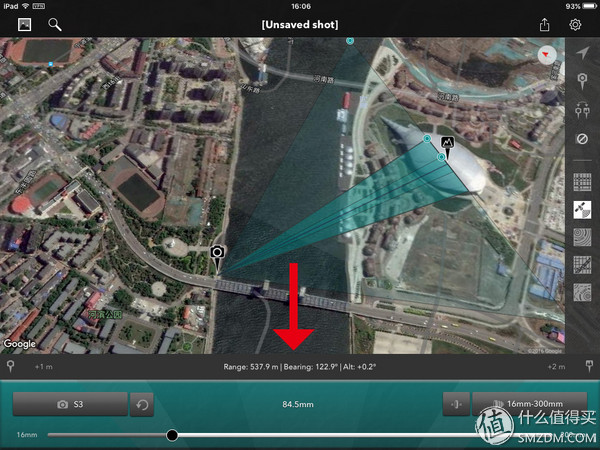
The content of the grey bar on the map above is my guess. I think the left side shows the camera's altitude. The right side should be the elevation of the target terrain, not the actual altitude. In the middle is the distance between the camera and the target, the azimuth angle, and an angle I can't guess. If you press it will appear angle screen
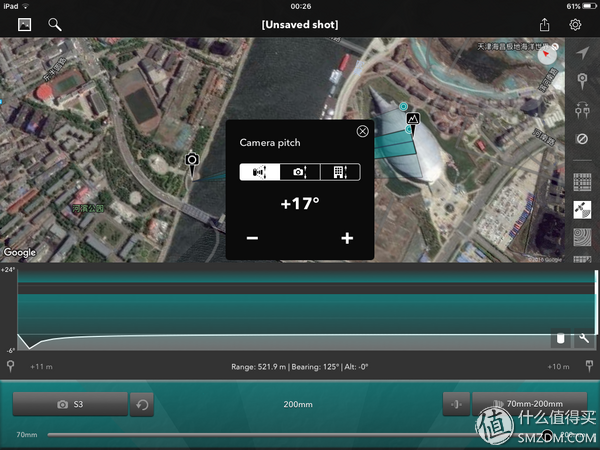
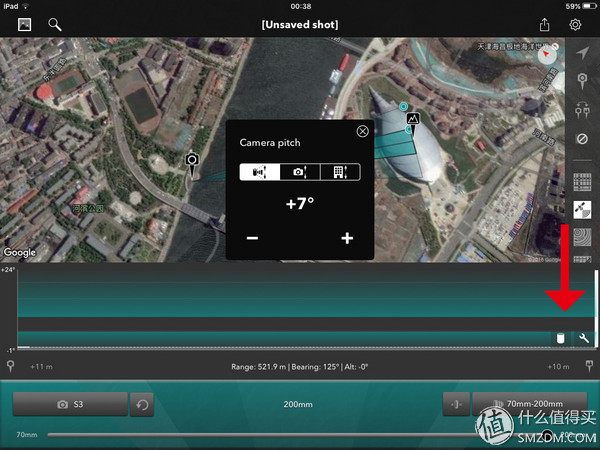
Then click on the wrench icon on the right. Three settings will appear. The first one is the angle setting of the camera. The camera angle you set is the middle bar of the green screen.
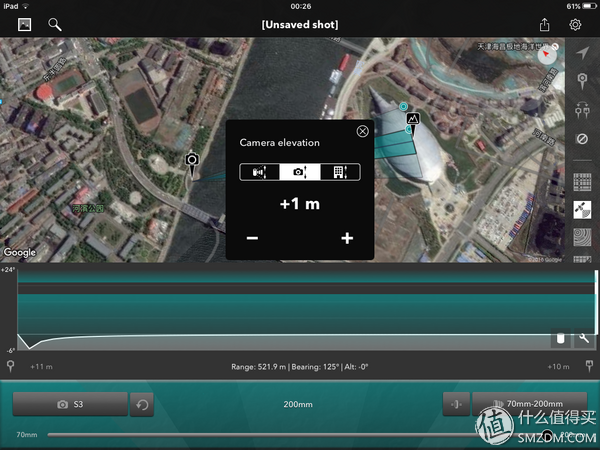
Camera level setting
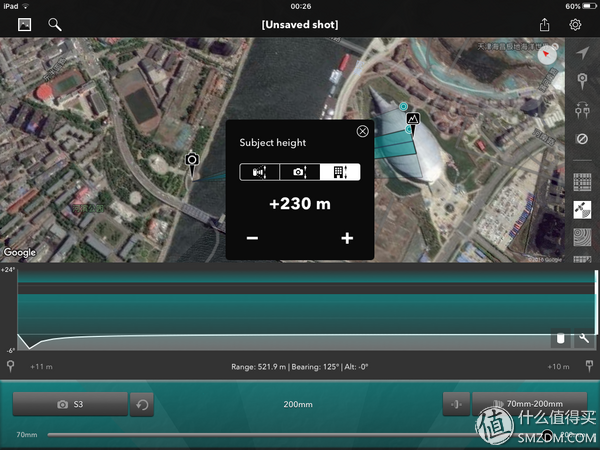
After the height of the target, all three are set, you can see the position where you can capture the target when the camera is at a certain degree.
The target was just set to 230 meters and the camera was 1 meter. When the camera angle is 7 degrees, you can see where the bar is in the middle

When the camera angle is set to 22 degrees, the horizontal bar is already at the top, and the left side can also see a 24-degree mark, which means that with the current position, the camera angle can be recorded at 24 degrees. At the very top, this is also very convenient. If you combine it with the previous angle of the moon, you can figure out when this target can be in the same picture as the moon.

In addition to the satellite mode, several other modes can be selected on the left side. However, in China, it seems that some features of terrain display are not obvious.
This app can help various mages to advance work in advance, especially where they haven't been, and then combine an app to simulate the rehearsal of the place where the moon was shot. After all, the moon moves fast and you adjust the camera. At the time, it may change the best position, so the combination of the two app feels very powerful.
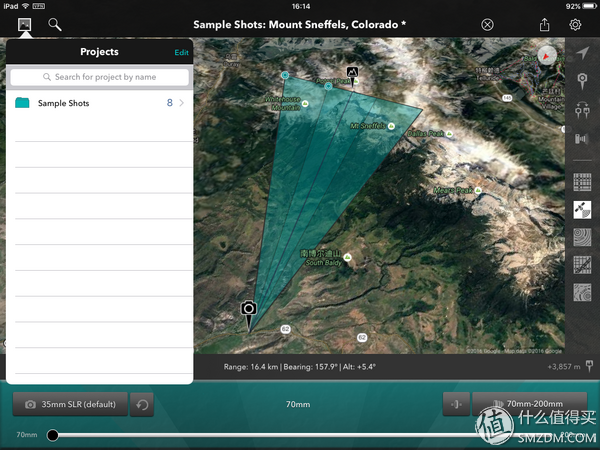
Let's talk about an interesting feature of this app. Click on the picture in the upper left corner. A folder and demo case will appear.
It contains all kinds of information, cameras, lenses, locations, notes, and photos
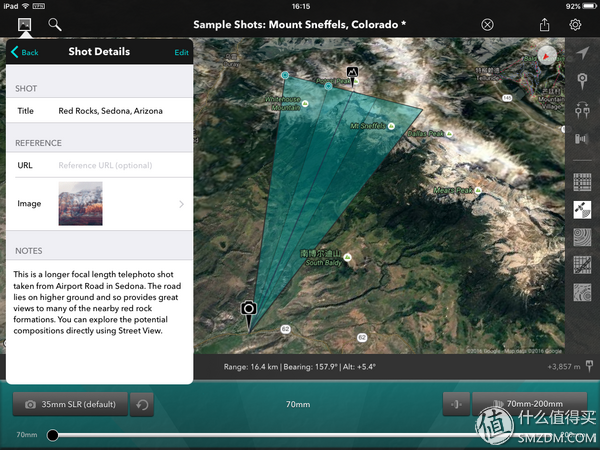
This is the picture in one of the cases, the picture taken from the position of the case camera. Is it right? You can build your own case for reference later.

Of course, just this way is not enough interesting, pick one more, and then enter the map of the setting of the case, click on the button of the camera on the left.
Go straight to Street View! Looking in the direction of the shot in the case, did you see a piece of cake under the southern slope? With the Street View function, you can directly see the picture you want to shoot. This feature is pretty good, but unfortunately it can't be used in China. When you go to the United States to play, you can try this feature and you should have a great picture of the scenery. help.
This method of staying on the moon in theory does not know that everybody understands it. However, this method will eventually remain at the theoretical level. The actual implementation will depend on the location of the terrain, the photography technology, and the ability to seize the benefits. Opportunity. Not much time, quickly pick up the camera to pat it! Look forward to Master's masterpieces!
In fact, the article was written in half in early September, and then the work was a bit busy and it was delayed. Then it was. . . It was only after the Mid-Autumn Festival that it was submitted. It should have been sent out for the Mid-Autumn Festival. I wish everyone a happy Mid-Autumn Festival!
In fact, before the release, during the Mid-Autumn Festival, a friend asked me to read this article. After watching the friends, it was still useful. I would have liked to send a few to serve as a teaching achievement, but afterwards, I still forget it. It would be fine to spray me, or don't put my friend on it.
CPG Generator 8 Series:power Range 50KWe-480KWe/50&60HZ
Generator,50KWe-480KWe
CCSN POWER GENERATION INC.(Engine is a subsidiary of CCSN) , https://www.ccsnengine.com