Here is a little experience about managing your own Linux desktop. I think it still has a lot of merits. Let me first talk about the inconveniences of most people ’s methods of managing the Linux desktop: buy a new computer, and you have to install Linux on the new computer, install various software, various libraries, various development environments, configure each This kind of service is really troublesome.
I have been using computer A recently, doing a lot of things, installing a lot of software, and configuring a lot of development environments and various services. However, for some reason, I want to start using computer B, which has not been used for a long time. Do you want to redo the configuration on A again on B?
Doing PPT under Windows, I found that I need to call up my previous program, and then run a few results based on several sets of input to draw a picture and insert it into the PPT. However, this program is written under Linux, and the process of compilation is also Relying heavily on your own Linux environment, it is too inconvenient to reboot into Linux to get the results and then return to Windows. It is even more difficult to configure your environment under Windows to run your own programs.
To install a certain software on the system, or to perform some more dangerous update operations (knowing that Archlinux rolling update is too normal), I am worried that the system will be hung up, and the system backup is too troublesome. To hang up, the system Recovery is more troublesome.
I have always used Archlinux as the main force, but recently I have to use a certain software for certain things. This software officially only provides the installation method on Ubuntu. There is no corresponding package in Archlinux, and manual installation on Archlinux is too inconvenient. Install Ubuntu, and then use Ubuntu for a few days, it is enough to toss. What's more, sometimes I just want to use a small amount of it. How can I minimize the time wasted on tossing?
Some software is not in the official software repository, and make install will install files that are not managed by the package manager in the system, and it will be inconvenient to uninstall in the future. I still hope that all files are in one package manager. Managed.
I heard that the new version of the kernel introduces something awesome? I just want to quickly test and play, my computer is still running, I do n’t want to restart, so I can only try it with a virtual machine. Moreover, it must be fast, I don't want to install a virtual machine for this purpose.
The above inconveniences can be overcome by some skills when managing the system by yourself. The purpose of this article is to introduce these skills. Through these techniques, the function we have achieved is: on one machine, Windows and several Linux systems can be installed at the same time. Under Windows, these Linux systems located on local disks can be run through virtual machines, and these Linux systems can also be accessed through containers or The virtual machines are running each other. And these systems can be easily backed up and deleted, and snapshots can be created and run at any time. And these Linux systems can be packaged and taken away at any time, and can be directly run on a U disk or other machines with little modification. If you want to change the computer, or install a new computer, you do not need to reinstall the system, you only need to synchronize the existing system to the new computer. This is exactly what the title of this article means.
For the convenience of writing, we assume that the reader has a brand new machine, the hard disk has not been partitioned, and no system has been installed. If everything has been installed, and I just want to migrate to my management method, I believe the reader can judge which steps in this installation tutorial are required and which steps are not required. In addition, it should be noted that this is not a step-by-step tutorial, and there are some obvious steps in the middle. I will skip it, so I hope that readers will not follow the commands in the article and run them one by one without thinking. It is to understand the purpose of these commands, and then make the appropriate changes according to your own situation.
Partitions and subvolumes
I won't talk about how to partition specifically, just find a livecd to boot into, and then find your own favorite partitioning program, and distinguish it according to your preferences. Be careful not to forget the EFI partition. What I need to say here is that when partitioning, no matter how many distributions are to be installed, there are only two partitions for Linux: one is swap and the other is a large btrfs partition. The btrfs partition contains all the files, including the user's personal data, and the rootfs of all distributions. When formatting these two partitions, you must take the Label for them. The benefits of doing so will be seen shortly. My habit is that the label of the swap partition is called "swap", and that btrfs partition is called "linux". After the partition is created, if the formatting is done under the graphical partition management program, then specifying Label is a very simple task, which is available in the right-click properties. If you used a command-line tool to format the partition, you can use the -L label option to specify the label, such as:
mkswap -L swap /dev/sdb4mkfs.btrfs -L linux / dev / nvme0n1p4
The different contents of that large btrfs partition are managed by btrfs subvolumes, specifically to create a separate subvolume for each different Linux system that you want to install. For example, my computer is installed with Archlinux, Ubuntu, Kali, Debian four systems at the same time, then there are four subvolumes in the btrfs partition: archlinux, ubuntu, kali, debian. The creation of subvolumes can be done with the btrfs subvolume create command. For example, to create my five subvolumes, all you need to do is:
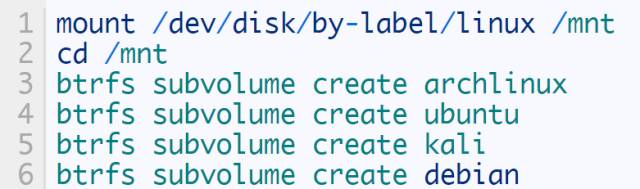
If you only want to install a distribution, such as archlinux, then only the archlinux subvolume is enough. In addition, if you want to put user data in a subvolume alone, it is entirely possible, but it is not recommended that multiple Linux systems share the same home directory, because the software installed on different systems is different, the same software version is not The same, even if the version is the same, different distributions may apply different patches, which leads to the configuration files generated in the user's home directory on one system are incompatible in another system, resulting in strange behavior.
System installation
After creating partitions and subvolumes, the next step is to install the operating system. Here are two cases: the first case is that you want to install a new Linux operating system; the second case is that you already have an available operating system, but just want to migrate this operating system to The management method mentioned in the article.
Clean install
If you want to install an operating system in a new way, the author only recommends pure manual installation, instead of using the official installation CD to continuously click "Next" to install. This is done to prevent the official installer from doing things we do n’t want him to do, such as automatically installing grub. For Archlinux and Gentoo, the only installation method is purely manual installation, so just follow the official tutorial. For deb system, you can use debootstrap program. For other distributions, you may not find the manual installation tutorial. At this time, you can create a new virtual machine, use the official installation program in the virtual machine to continue to click "Next" to complete the installation, and then follow the next section. The existing system migration tutorial migrates the system from a virtual machine to a real machine; in addition, readers can also find the source code of the official installation program provided by the distribution to read it and see what these installation programs are doing. I know how to install it manually. The code of the installation program is relatively simple. Readers who have time may wish to try it. Let's talk about the installation process in detail, only Archlinux and deb systems are introduced here. If there are multiple Linux systems that need to be installed, it is recommended to install and fully configure one of them to make this system available and convenient to use, and then install other systems on this available system. Here we assume that the reader has completed the partition, created the corresponding subvolume, and mounted the btrfs partition on / mnt.
Archlinux manual installation
Archlinux manual installation mainly depends on the official tutorial. When partitioning, please pay attention to the method described above. The very crucial pacstrap step is to install it into the subvolume using the following command instead of the entire btrfs partition:
pacstrap -d / mnt / archlinux base
As for fstab, do not use the method in the tutorial to generate it. Our management method is relatively unconventional, and it is better to write fstab by ourselves. The bootloader should also be installed and configured as described below in this article. As for other operations such as setting the keyboard, setting the network, and setting the time zone, just follow the tutorial.
deb series manual installation
The tutorials found on the system of the deb system are all tutorials that use the installation program that comes with the distribution. There is no manual installation tutorial as detailed as Archlinux. Because we want to install manually, we will not refer to the deb installation tutorial on the Internet. But we still have a tutorial to refer to, that is the systemd-nspawn tutorial in the Archlinux wiki. This tutorial has a section on how to install Debian or Ubuntu using debootstrap. For the specific installation process, please refer to the above tutorial. The key commands are as follows:
debootstrap --arch amd64 zesty / mnt / ubuntu http://archive.ubuntu.com/ubuntu/
It is worth mentioning that we do not necessarily need to use the livecd of the deb system to install the deb distribution. Any livecd that can install the debootstrap program is possible. For example, we can use the livecd of Archlinux to start, and then install debootstrap and install Ubuntu through debootstrap.
Note that debootstrap does not install a complete and complete operating system like the official installer, but only installs the most basic software packages. Readers need to install desktop environment and other software packages according to their own circumstances. At the same time, fstab and bootloader should be configured according to the method of this article.
Existing system migration
The migration of the Linux system is actually very simple, it is nothing more than copying all the rootfs files to the destination. Although this process may seem simple, there are still some things to be aware of. For example, if a symbolic link is not handled properly, the symbolic link will be accidentally turned into a physical file, which is not good. As another example, if the file permissions and other metadata problems are not handled properly, the metadata may be lost during the copy process. Both of these problems may cause the system to not operate normally. Another thing to note is that in a normal operating system, there will be / proc, / dev and other directories. These directories are separate virtual file systems, which do not need to be copied, and cannot be copied.
We now assume that the user wants to migrate the Ubuntu system located at A to the target subvolume / mnt / ubuntu. Among them, A may be located in a virtual machine, may be located on another computer, or may be located on a local disk. To migrate the system, generally speaking, there are two steps that need to be done:
Mount the corresponding partition and set up ssh to ensure that we can access A.
Use the rsync or btrfs send command to send data from A to the target subvolume.
The first step is not to say how to do it. There are three situations and a few words to summarize how to do it:
If it is just a partition, mount is enough
If it is another machine, configure that machine with ssh to ensure that the root user can access with ssh
If it is a virtual machine, there are two options. One is to find a way to mount the disk image of the virtual machine and then process it as in case 1. The other is to configure the network and ssh and process it as in case 2. The specific measures to be taken should be based on your own situation.
The second step is to introduce two methods of rsync and btrfs send.
We now assume that A's ip address is 192.168.88.3. Then just execute the following command:
rsync -aAXv --exclude = {"/ dev / *", "/ proc / *", "/ sys / *", "/ tmp / *", "/ run / *", "/ mnt / *", "/ media / *", "/ lost + found"} .3: / / mnt / ubuntu
Readers are reminded here whether there are other files on their system that do not want to be synchronized, and remember to exclude them.
btrfs send can only be used if A's rootfs is also btrfs. See here for a tutorial on this method. The first thing you need to do is to create a read-only snapshot of rootfs on machine A (note that the following command is executed on machine A):
btrfs subvolume snapshot -r // ubuntu
Note that the name of the snapshot in the above command must be the same as the name of the target subvolume, so that you can save the trouble of changing the name in the future. Then you can use the btrfs send command to send the contents of the snapshot / ubuntu to the destination. Before that, we need to temporarily delete the ubuntu subvolume created when our partition is created. This subvolume will be automatically recreated during the reception process:
btrfs subvolume delete / mnt / ubuntussh .3 btrfs send / ubuntu | btrfs receive / mnt
Finally, delete the snapshot just created on the A machine.
btrfs subvolume delete / ubuntu
bootloader and fstab
The system is installed, our fstab has not been set, and the boot manager has not been installed and configured. Let's talk about how to configure these two things. We said before that we must get a Label for the partition. Mystery is here. The key to how to directly run Linux installed on a local disk in a virtual machine and how to package a system directly without changing too many configurations is also here.
fstab
Let's talk about fstab first, fstab has a total of five columns, namely fs, mountpoint, type, opts and dump / pass. Why do these five columns mean, and how do you fill in fstab? You will find it on the Internet and will not repeat them here. Here we only say what we need to do is different from the normal.
The first thing to note is that when you fill in the fstab, you usually like to fill in the fs column like / dev / sda4 or UUID = d5acc217-d524-4a2d-a937-bad945a047b2, but this is not enough here, here What we fill in is something like / dev / disk / by-label / linux. In other words, our fstab finds the partition through the label of the partition. The reason for this is that we hope that our rootfs can not only be started on this machine, but also hope that it can be in a virtual machine environment, or when we take the rootfs and take it to another machine for synchronization. Normal start. The partition where the rootfs is located on this machine is called / dev / sda4, and it is not necessarily called / dev / sda4 on other machines or virtual machines. But as long as we abide by our own naming rules, we take the same Label for these partitions on all machines, then our fstab is universal and does not need to be changed for different environments.
The second issue to note is that you should not fill in the entry for rootfs. This approach is very different from the usual distribution or other users' default practices. In order to understand this, let's talk about the startup process of the Linux system. Normally, when Linux starts, the bootloader first loads the kernel into memory and passes parameters to the kernel to tell the kernel the location of rootfs. Then the kernel will mount rootfs in read-only mode according to the passed parameters and execute the init program in rootfs. The init program will call the corresponding initialization program to perform various initialization operations. One of the initialization operations is to remount rootfs in read-write mode according to the configuration of fstab, and mount all other partitions configured in fstab to the specified location. Understand the process of Linux startup, we know that the rootfs line in fstab is actually not necessary. After deleting the rootfs line, we only need to modify the parameters passed to the kernel by the bootloader, and we can tell the kernel to mount the rootfs directly by reading and writing instead of read-only.
So, what is the benefit of not writing rootfs when we write fstab? The advantage is that we not only hope that our system can be used on bare metal, but also that our system can be used on a virtual machine. When setting the qemu virtual machine below, we will pass our subvolume to the virtual machine in the way of virtfs. At this time, rootfs is no longer / dev / disk / by-label / linux. If we take rootfs The mounting method is hard-coded into fstab, which will cause the init program to fail and fail to start.
Another trick worth mentioning is that many times we have other partitions that we want to mount automatically. The problem is that these partitions do not necessarily exist in the virtual machine environment, which will cause the boot to fail because it cannot be mounted at boot. In fact, the designers of the system have long considered this problem. If you don't want some entries in fstab to be automatically mounted, just add noauto to the options. If you want some items to be automatically mounted, but these items are not so important, even if the mount fails, you do not want these items to cause startup failure, you can add nofail in the options. These two options really provide great convenience for our system management. For example, we may add / dev / disk / by-label / swap entry in fstab, so that the partition will be automatically set as a swap partition for system use when booting. However, as we will see later, when we set up the virtual machine, this partition is not necessarily available in the virtual machine environment. In this case, we hope that when the system cannot find this partition, it will directly ignore the error without using swap, rather than refuse to start with an error.
Having said that, it is better to directly paste an example of fstab:
tmpfs / tmptmpfsdefaults0 0 / dev / disk / by-label / swapnoneswapdefaults, nofail0 0
bootloader
Let's talk about the boot manager again. The boot manager recommended by the author here is refind, which is available on the official website of the installation tutorial, so I won't go into details here. Here only talk about how to write startup items. First paste the sample code:

The volume in the third line is used to specify the partition where the kernel is stored. This partition can be specified in many ways, such as through the partition GUID, but the most important thing for us is to specify it through the label of the file system. Our rootfs partition Label is "linux", so this line is written volume linux.
The next step is to specify the kernel location, kernel parameters and initramfs location. The loader is used to specify the kernel location, the options are used to specify the kernel parameters, and the initrd is used to specify the location of the initramfs. The example is the Archlinux system, and the kernel is the boot / vmlinuz-linux file in the archlinux subvolume, so write loader archlinux / boot / vmlinuz-linux. Similarly, the initrd line is written initrd archlinux / boot / initramfs-linux.img. As for the kernel parameters, root = / dev / disk / by-label / linux tells the kernel where our rootfs is located, rootflags = subvol = archlinux tells the kernel to mount a subvolume named archlinux, and rw tells the kernel to mount it by reading and writing. Set. For Ubuntu systems, these three lines should be written:
loader ubuntu / vmlinuzoptions "root = / dev / disk / by-label / linux rootflags = subvol = ubuntu rw" initrd ubuntu / initrd.img
Attentive readers may have found that our refind configuration file uses all their labels when specifying the partition, which ensures the universality of this configuration file. Change the computer as long as you use the same management method With the same naming convention, nothing in the configuration file needs to be moved, just copy it in the past.
System backup and recovery and snapshot application
Due to the use of btrfs dynamic volumes, backup and recovery work is very simple. The backup system only needs to create a snapshot:
cd / mntbtrfs subvolume snapshot archlinux backup
As for recovery, in fact, we don't need recovery at all, just use the snapshot as rootfs. We only need to go to the refind configuration file and change the corresponding startup items. For example, for Archlinux, it only needs to be changed to:

If there is obsessive-compulsive disorder, it is very uncomfortable to say that the rootfs name is not archlinux, it is actually very simple to change the name:

In fact, the snapshot function of btrfs can not only be used to backup and restore the system, but also a lot of very flexible applications. For example, I want to install a huge and confusing software in the system. I only want to use this software for a few days to do one thing, and I do n’t want to use it after finishing this thing. The problem is that this software is not in the official software warehouse. To install it, I can only use the installer provided by the software to install it. However, the software does not provide an uninstaller, or the uninstaller is not completely uninstalled, which will leave garbage in the system . I want to use this software, but I don't want to dirty my system, what should I do? It's very simple: create a snapshot and add a new startup item with the snapshot as the rootfs. If you want to use the software, start it into the snapshot. After using this software, you can delete the snapshot. As another example, I want to build a virtual machine to test something with a physical machine (such as testing certain network protocols, testing certain cluster management software, etc.). At this time, I do n’t need to use the installation CD to install it again. For a virtual machine, you only need to create a snapshot, and then start the snapshot as the rootfs of the virtual machine. The specific method will be described below, and I won't say much here. Of course, the application of snapshots is far more than what I said, and more fun applications still need to be explored by readers.
Access Linux under Windows
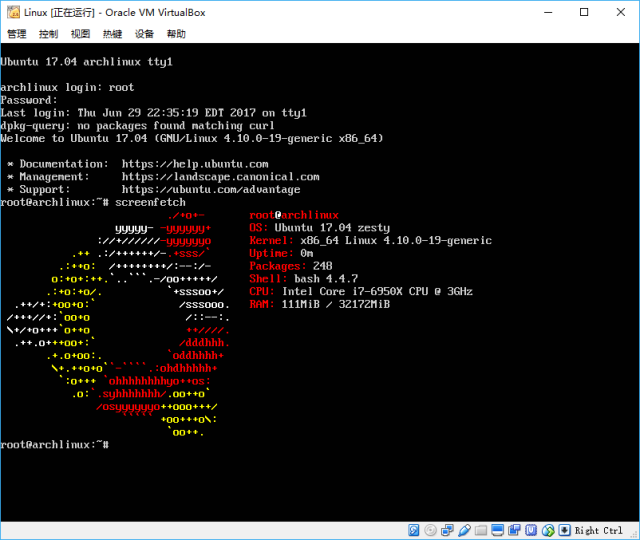
From the beginning of the article, we said that sometimes we have the need to run locally installed Linux under Windows. This requirement can be satisfied by VirtualBox, just use the local disk as a virtual disk in VirtualBox. It is simple to say, but it still takes a while to realize.
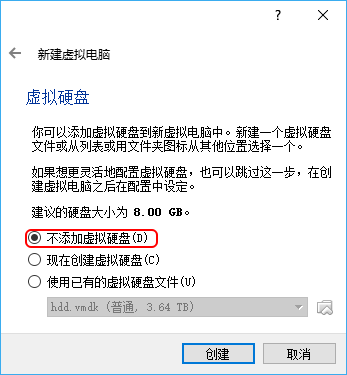
First of all, we need to create a new virtual machine. The specific process does not say much. The next step is all the way. The only thing to note is that in the step of creating a virtual disk, select "do not add a virtual hard disk":
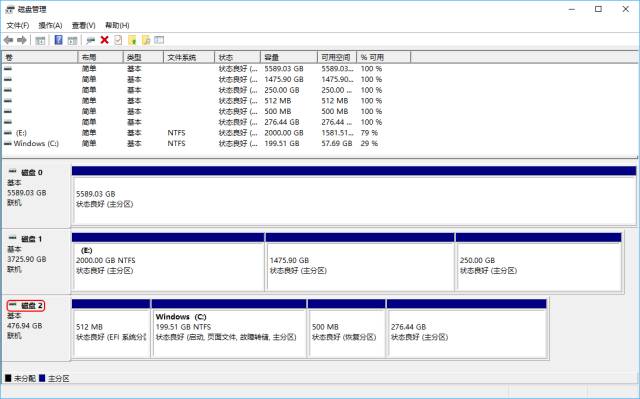
Here my virtual machine is named "Linux". After creating the virtual machine, you need to set the local disk as a virtual disk. The first thing to do is to find the number of the disk where we installed Linux. This can be found in the disk management program that comes with the system. On my machine, this disk number is 2:
Knowing the disk number, you can create a virtual disk. Here we use the following command, pay attention to run as an administrator:
VBoxManage internalcommands createrawvmdk -filename "C: UsersgaoxiangVirtualBox VMsLinuxlocaldisk.vmdk" -rawdisk \ .PhysicalDrive2
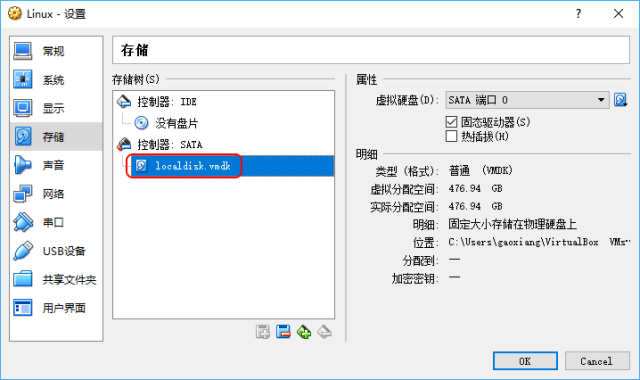
Now that you have a virtual disk, you can add the virtual disk to the virtual machine:
The virtual disk is set up, the last step is to set up EFI. Since we previously assigned Label to the file system when partitioning, and also used Label to specify the partition when setting the refind, the same set of refind configuration can also be used on the virtual machine. Therefore, we do not need to install the bootloader for the virtual machine separately, but directly use the refind in the EFI partition that we installed on the physical disk. VitualBox does not enable EFI by default. We need to manually check EFI in the system settings of the virtual machine:

In order to allow VirtualBox to automatically start refind, you must also make some simple settings for the EFI partition. You must pay attention to these settings. These settings must be universal, that is, the same file can work on both physical and virtual machines. On the normal work, do not change the settings after the virtual machine can run but the physical machine hangs, which is not fun. VirtualBox's EFI will give priority to /EFI/BOOT/BOOTX64.EFI when starting. If it cannot be found, the bootloader specified in startup.nsh in the root directory of the EFI partition will be started. Knowing this, in order to automatically start refind, you first need to check whether the file /EFI/BOOT/BOOTX64.EFI exists. If it exists, back up and delete it:
cd EFI / BOOTmv bootx64.efi bootx64-backup.efi
Then just create a new startup.nsh in the root directory of the EFI partition. This file only needs one line and the content is as follows:
EFI efind efind_x64.efi
Everything is set up, run the virtual machine, you can see the familiar refind interface:

Open the Ubuntu system and test everything is normal and you are done:
Of course, if you want to use it in a virtual machine, there are still some detailed tasks to be dealt with, such as the corresponding kernel module required by the Guest of VirtualBox installation, etc. These are not discussed here. Just put it on.
Mutual access to different distributions under Linux
We have successfully run Linux under Windows, the next step is to find a way to access other Linux under a Linux system. Since these systems are all Linux and are in the same file system, if you just want to access the files inside, just mount them and use them. But many times we still need to run programs installed in other systems or manage that system. There are two solutions to this demand: containers and virtual machines.
Many readers may not understand the difference between the two. Here is a brief introduction. Roughly speaking, a virtual machine virtualizes a set of hardware environment through software, and starts the kernel in this set of hardware environment. Then the kernel will perform a complete boot process, including corresponding initialization, loading init program, etc. In contrast, containers are much lighter. The container does not virtualize its own hardware environment, nor does it load an additional kernel. What the container does is to use the namespace to create a set of independent process PIDs, mount points, network interfaces, user IDs, etc. on the existing kernel, because the identifiers such as these IDs in different namespaces are all It is independent, so the processes in different namespaces cannot see each other. The virtual environment at first glance looks like a system running alone. There is also an init process with PID 1 and its own set. Independent rootfs, etc. The advantage of the virtual machine is that it is less likely to be broken through, the security is better, you can use your own kernel, but the efficiency is also lower. The advantage of the container is that it is light and efficient, but the security is slightly worse, and it is impossible to use a custom kernel.
container
The most familiar container under Linux is chroot, but the author does not like chroot for two main reasons:
/ proc, / dev and other things will not be automatically mounted, so I feel tired when manually mounting
Without a relatively complete boot process, many services that I hope to start automatically will not run
For the above reasons, the container recommended by the author here is systemd-nspawn. The use of systemd-nspawn is very simple. Assuming that your Linux partition has been mounted on / mnt, then you only need the following steps to start a systemd-nspawn container (using Debian as an example):
cd / mnt / debiansystemd-nspawn -b
Then you can see the boot interface, which is really convenient and fast. Here is a little trick, if you think it is too troublesome to mount the Linux partition to / mnt every time you open the container, you can create a new directory for each system in / var / lib / machines and then set it in fstab The corresponding subvolumes are automatically mounted in one click:

The advantage of this is that the root directory is located in the system of / var / lib / machines. When starting systemd-nspawn, you can directly use the -M option to specify the system without entering the corresponding directory. For example, if you want to start the Ubuntu system:
systemd-nspawn -b -M ubuntu
virtual machine
If you just want to run the programs in other systems, then the container is enough, but sometimes we still need to play with different kernels, which must use a virtual machine. Normally, when you use a virtual machine, you create a new disk image, then insert the installation CD, and then install the CD onto the image. The disadvantage of this is that it is inconvenient to access the files in the mirror, and the other is that we have already installed several systems locally. It is really far away to go to the mirror and not install it again. Then let's find a way to use the subvolume as the rootfs of the virtual machine. The difficulty is that the virtual machine is a very independent thing and cannot directly access the host's file system. Fortunately, the Linux kernel virtualization solution KVM provides a solution to pass the local file system to the virtual machine. The thing used is called VirtFS.
The good news is that VirtFS can be used as rootfs. But in order to mount VirtFS normally, the kernel must have the corresponding driver. There are two ways to do this. If you compile the kernel yourself, it is recommended to compile the corresponding driver directly into the kernel instead of the module. According to the instructions on the official website, the kernel configuration involved is as follows:
CONFIG_NET_9P = yCONFIG_NET_9P_VIRTIO = yCONFIG_9P_FS = yCONFIG_9P_FS_POSIX_ACL = y
If you are using the kernel provided by the distribution, you can modify the relevant settings of initramfs to ensure that 9p, 9pnet, 9pnet_virtio three modules can be installed into initramfs. Take Ubuntu as a guest here as an example. The specific method is to modify the / etc / initramfs-tools / modules file in the Ubuntu system and add the following three lines:
9p9pnet9pnet_virtio
Then regenerate initramfs:
update-initramfs -u
After the kernel driver is set, you can start the qemu virtual machine. It is assumed that the rootfs of Ubuntu has been mounted to / var / lib / machines / ubuntu:
qemu-system-x86_64 -enable-kvm -m 16G -kernel / var / lib / machines / ubuntu / vmlinuz -initrd /var/lib/machines/ubuntu/initrd.img -virtfs local, id = root9p, path = / var / lib / machines / ubuntu, security_model = passthrough, mount_tag = root9p -nographic -append 'root = root9p rw rootfstype = 9p rootflags = trans = virtio console = ttyS0 init = / lib / systemd / systemd'
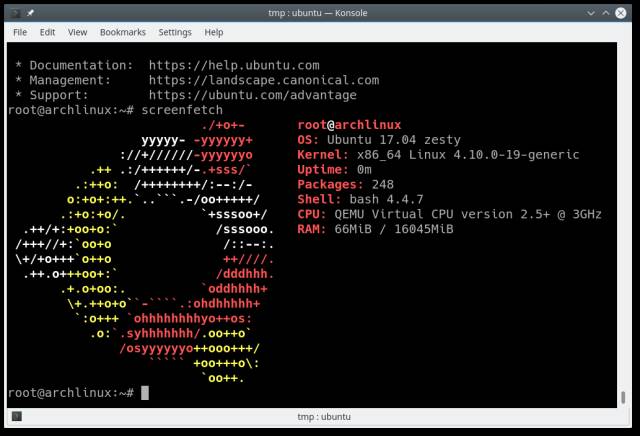
Finally, put a successful screenshot:
Diskless system
In some specific application scenarios, the diskless system still has many conveniences. Especially for computer clusters, using a diskless system not only saves the cost of buying hard drives, but also greatly simplifies the management of the cluster. Although we do not have a cluster to manage, it is good to make a diskless system on the hard disk to replace livecd and perform some system recovery operations when needed. For students who have multiple Linux installed at the same time, it is not very practical when it comes to livecd. Occasionally one system fails, and it is better to enter the other system to repair the failed system. However, some operations still have to use livecd. For example, if you want to adjust the size and location of the Linux partition, this partition cannot be in the mounted state, so you have to use livecd. Compared with livecd, the advantage of self-made diskless system is mainly customizability. To give a practical example that many people have encountered: the system has failed, enter livecd to repair the system, when trying to use vim to change a configuration file, the system prompts that vim is not installed, if you want to install, the system prompts The file system is read-only and cannot be mounted. In fact, no vim is just a trivial matter, using vi or nano will pass in a flash. But if you have worked hard to download and burn livecd, but found that the necessary software for repairing the system is not available and cannot be installed, it is estimated that you have the heart to smash the computer. Since livecd is so difficult to use, why not make a diskless system that is exactly the same as the desktop you usually use?
To do a diskless system, one way is to get an nfs on another machine, and then use nfs as the root to start when the machine starts (need to enable the ROOT_NFS option in the kernel configuration), this method has the advantage of memory The occupancy is relatively small (it is much smaller than the method that the author will introduce next), but it is more troublesome to configure, and the network delay and bandwidth also seriously restrict the performance of the system. Since the author's computer has as much as 128G of memory, it can be squandered without saving memory, and the author only wants to simply and rudely use the desktop he usually uses as a diskless system to start, and does not want to toss about it. Therefore, the final solution adopted by the author is based on initramfs. To understand the production process, you need to understand a few terms:
ramfs, tmpfs, rootfs, and initramfs
To understand the working principle of this program, you need to understand these terms in the title of this section. These terms are well explained in the official documentation of the kernel, here we just make a brief summary.
Let's start with the disk caching mechanism of Linux. When a program accesses a file, Linux will read the file into memory and cache it. If the files in the disk cache have not been modified, or have been modified but the changes have been synchronized from the cache to the disk, in this case the kernel will mark the corresponding disk cache as clean. For files that have been modified but have not had time to sync to disk, the kernel will mark them as dirty. When Linux has insufficient memory and needs to release memory, Linux will release some clean parts of the disk cache, so that the memory can be used for other purposes. Ramfs is a virtual file system. Intuitively, it is equivalent to directly mounting the disk cache to the corresponding node: the files in it only survive in the disk cache. And because there is no physical disk to synchronize the data, the cache of these files is always dirty, which also ensures that these files will not be released by the kernel. And tmpfs is an extension to ramfs. Compared to ramfs, it allows to limit the size of the file system and also allows data to be moved to swap.
Rootfs is also a virtual file system, it is a special ramfs that is used exclusively at startup.è¦æƒ³ç†è§£rootfs,需è¦äº†è§£Linuxå†…æ ¸çš„å¯åŠ¨è¿‡ç¨‹ã€‚这个过程ä½äºŽå†…æ ¸æºç init/main.c文件ä¸çš„kernel_init函数ä¸ï¼Œæœ‰å…´è¶£çš„读者å¯ä»¥è¯»ä¸€ä¸‹ä»¥ä¾¿æ·±å…¥äº†è§£ã€‚简å•æ¦‚括就是:Linuxå¯åŠ¨çš„时候,会创建一个rootfsï¼Œå¹¶æŠŠæ ¹ç›®å½•â€œ/â€æŒ‚载为rootfs。这个rootfs将会伴éšLinux终生:跟initè¿›ç¨‹æ— æ³•è¢«ç»ˆæ¢é“ç†ç±»ä¼¼ï¼Œrootfsæ˜¯æ— æ³•è¢«å¸è½½çš„。 rootfs创建好以åŽï¼ŒLinuxå†…æ ¸ä¼šæŠŠbootloaderæ供的initramfs文件ä¸çš„内容解压到rootfsä¸åŽ»ï¼Œå¦‚果解压好的文件ä¸èƒ½æ‰¾åˆ°/init或者用户通过rdinit=å†…æ ¸å‚数指定的其他init程åºï¼Œé‚£ä¹ˆå†…æ ¸ä¼šæ‰§è¡Œè¿™ä¸ªinit程åºï¼Œå¹¶å°†æŽ¥ä¸‹æ¥çš„åˆå§‹åŒ–工作(比如挂载真æ£çš„rootã€åˆ 除旧的rootfsä¸çš„内容以节约内å˜ã€æ‰§è¡ŒçœŸæ£çš„rootä¸çš„init程åºï¼‰äº¤ç”±è¿™ä¸ªinit程åºè´Ÿè´£ã€‚如果æ¤æ—¶rootfsä¸æ— 法找到相应的init程åºï¼ŒLinux就会å°è¯•æŒ‚载真æ£çš„root,并执行rootä¸çš„init程åºã€‚
基于initramfsçš„æ— ç›˜ç³»ç»Ÿåˆ¶ä½œ
了解了上述的原ç†ï¼Œæˆ‘ä»¬çš„æ— ç›˜ç³»ç»Ÿåˆ¶ä½œæ€è·¯ä¹Ÿå°±æ¸…晰了:我们直接把自己的桌é¢æ‰“包æˆä¸€ä¸ªcpio,然åŽä½œä¸ºinitramfsæä¾›ç»™å†…æ ¸ï¼Œç„¶åŽé€šè¿‡rdinitå‚æ•°å‘Šè¯‰å†…æ ¸å¯åŠ¨systemdå³å¯ã€‚具体åšæ³•ï¼Œè¿™é‡Œå°±ä»¥Ubuntu为例,并å‡å®šLinux分区被挂载在/mntä¸ã€‚首先需è¦æŠŠæˆ‘们的桌é¢åˆ¶ä½œæˆä¸€ä¸ªcpio包:
cd /mnt/ubuntufind -mindepth 1 -printf '%P\0' | LANG=C bsdcpio -0 -o -H newc | xz -T 21 -9e --check=crc32 > ../ubuntu.cpio.xz
å…¶ä¸xz命令ä¸çš„çº¿ç¨‹æ•°è·ŸåŽ‹ç¼©æ¯”è¯·æ ¹æ®è‡ªå·±çš„实际情况设置åˆé€‚的值。å¦å¤–注æ„如果内å˜å¤ªå°è£…ä¸ä¸‹æ•´ä¸ªæ¡Œé¢ï¼Œé‚£ä¹ˆè¿™ç§æ–¹æ³•æ˜¯ä¸å¯èƒ½æˆåŠŸçš„。有了cpio文件,è¦æƒ³å¯åŠ¨æ— 盘系统,åªéœ€è¦åœ¨refindä¸å¢žåŠ 相应的èœå•æ¡ç›®å³å¯ï¼š
menuentry Ubuntu-diskless { icon EFI/refind/icons/os_ubuntu.png volume linux loader ubuntu/vmlinuz options "rdinit=/lib/systemd/systemd" initrd ubuntu.cpio.xz}
XB5 series Pushbutton Switch is copy Schnaider newest design, which with high quality plastic material and smart design.In electronics, the switch is an electrical component which can break electrical circuit,interrupting current or diverting it from one conductor to another.The most familiar form of switch is a manually operated electromechanical device with one or more sets of electrical contacts.

XB5 Series Pushbutton Switch,Push Button Electrical Switch,Led Push Button Switch,Small Push Button Switch
Ningbo Bond Industrial Electric Co., Ltd. , https://www.bondelectro.com